Raspberry PI as IoT server
This tutorial covers a demonstration of installing machbase-neo on Raspberry PI, collecting and retrieving sensor data.
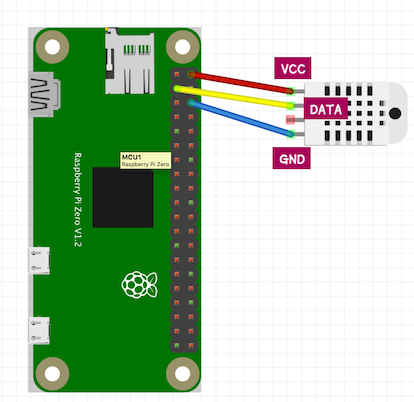
Connect DHT11 to Raspberry PI
Before you connect DHT11 sensor into Raspberry PI’s gpio, turn off Raspberry PI first.
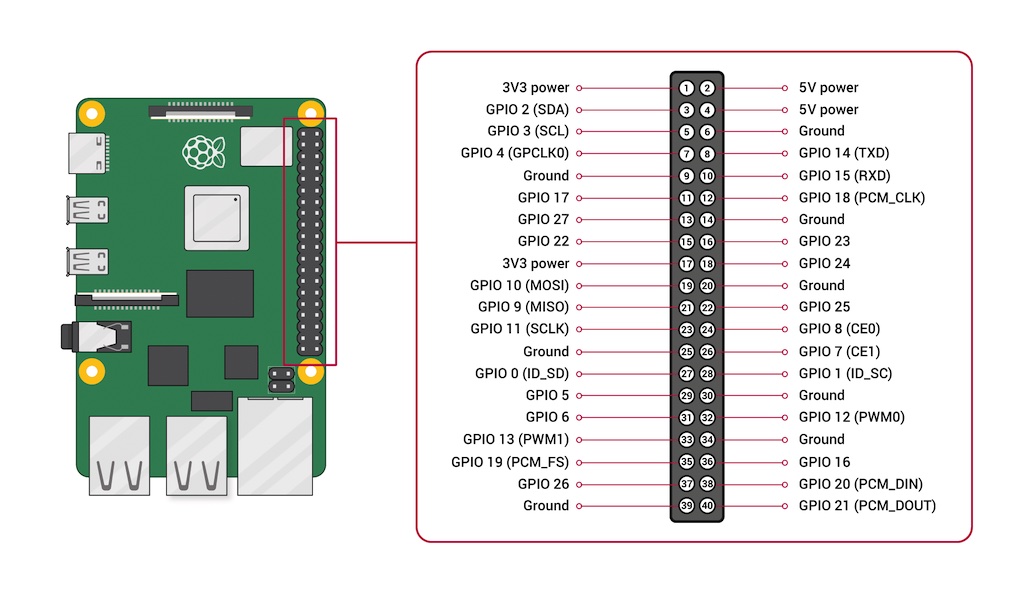
DHT11 has 3 leads - VCC, DAT, GND connect each lead to gpio 2, 3, 6.
Read sensor data
- Raspberry PI 4 model B (4GB Mem in this tutorial)
- Adafruit_DHT 11 (sensor)
Install Adafruit_DHT python module for accessing sensor data.
pip3 install Adafruit_DHTThe code reads data from the GPIO 2 pin (pinnum = 2), which is connected to the DATA lead of the DHT11 sensor.
It outputs the data in the form of “name, timestamp, value” to the standard output in every second.
To ensure that machbase-neo can handle the time with nano-second precision,
the sample code sets the timestamp using multiplication by 1000000000.
import Adafruit_DHT
from time import time
from time import sleep

pinnum = 2
sensor = Adafruit_DHT.DHT11
while (True):
    hum, temp = Adafruit_DHT.read_retry(sensor,pinnum)
    ts_ns = int(time() * 1000000000)
    if hum is not None and temp is not None:
        print(f'temperature,{ts_ns},{temp}')
        print(f'humidity,{ts_ns},{hum}')
        sleep(1)
Save this code as dht.py and execute dry-run.
$ python dht.py
temperature,1676008535430951936,28.0
humidity,1676008535430951936,33.0
temperature,1676008536956561152,28.0
humidity,1676008536956561152,33.0
temperature,1676008538482078464,28.0
humidity,1676008538482078464,33.0
temperature,1676008540007633664,28.0
humidity,1676008540007633664,33.0
^C
Install machbase-neo
- Connect to PI via SSH or console
$ ssh -l pi <ip address>- Make
demodirectory
mkdir demo && cd demo- Download machbase-neo
sh -c "$(curl -fsSL https://docs.machbase.com/install.sh)"- Unarchive zip file
$ unzip machbase-neo-{{ site.latest_version }}-linux-arm64.zip
$ cd machbase-neo-{{ site.latest_version }}-linux-arm64- Start machbase-neo
./machbase-neo serve
Press Ctrl+C to shutdown machbase-neo.
Setup machbase-neo’s network
Bind ip address for accessing out side of Raspberry PI
As machbase-neo’s boot message shows, it is listening only localhost(127.0.0.1).
If you are going to access machbase-neo remotely (e.g via HTTP) from your laptop and other application server,
It is required to bind host ip address with --host <bind_ip_addr> option.
./machbase-neo serve --host 0.0.0.0Storing data
Create table example
While machbase-neo serve is running, create example table by the shell command below.
./machbase-neo shell "create tag table if not exists EXAMPLE (name varchar(100) primary key, time datetime basetime, value double)"Write data into machbase-neo
Execute dht.py and redirect its output to machbase-neo shell import.
Import command accepts csv format by default and keep writing incoming line by line to the specified table (here example) until it reaches to the EOF.
python dht.py | ./machbase-neo shell import exampleSince we redirect python’s standard output into machbase-neo shell import command by pipe |, there will be no output message.
Read data from machbase-neo
Read recently written data
While running writing process, open another terminal and run sql the check the recently written data.
The option --tz local is for displaying TIME field in local time zone instead of UTC.
./machbase-neo shell walk --tz local 'select * from example order by time desc'Press r key to re-execute query to refresh new data.
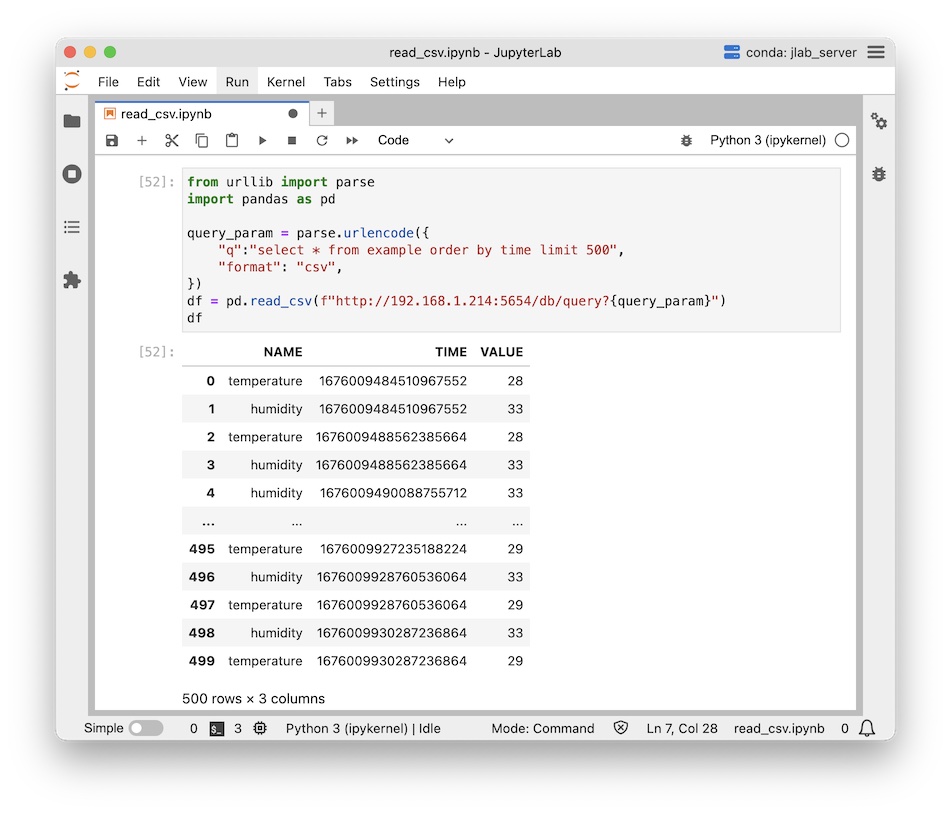
Read data from application
Since machbase-neo provides HTTP API for application to the query stored data, it is easy requesting HTTP query data with SQL like below.
from urllib import parse
import pandas as pd
query_param = parse.urlencode({
    "q":"select * from example order by time limit 500",
    "format": "csv",
})
df = pd.read_csv(f"http://192.168.1.214:5654/db/query?{query_param}")
df